
Alcohol markers dry quickly, blend smoothly and are slightly transparent, so are used by professional artists, crafters and hobby sketchers alike. Unlike the water based markers typically used by children, alcohol markers do have a bit of a stink. My kid has the Touch-Bool markers from Wish.com and they stank like fish. (I don’t mind a fishy smell, but only if it’s actually fish.)
And although professional artists use them, they are not lightfast, not even the expensive ones, so the colour in your artwork will fade over decades.
WHAT’S SO SPECIAL ABOUT ALCOHOL MARKERS?
If you’re used to colouring with plain old Faber Castells, be sure to slow your strokes down when you switch to alcohol markers. The ink needs time to do its thing on the page — interacting with the paper, interacting with other colours.
And if you’re not used to layering markers, you might want to start now that you’re moving to alcohol markers, because that’s where they shine. Try layering two or three colours over top of each other.
Where alcohol markers really have an advantage over the felt tips you grew up with: You can play around with alcohol. No, not like that. Rubbing alcohol. You can dab it on, spray it, blend with it… and create really interesting painterly effects.
VARIOUS BRANDS OF ALCOHOL MARKER
There are many brands, some of them established, some newer.
Alcohol markers generally come with a different nib at each end, bullet and chisel. Some also have a brush tip version. The bullet tips tends to vary quite a lot in firmness between brands. That said, the brush tips vary even more in quality. Most bullet-chisel nib alcohol markers are similar in quality.
You’ll pay more for markers which you can refill. Some of those more expensive ones also have replaceable nibs.
- Altenew
- Arteza Everblend — These triangular pens come in an artcase with flipable panels. Replaceable nibs. Not a good selection of pastel colours. Impressive blending.
- Arrtx
- Arteza
- Artify — triangular barrel, which is unusual. The caps come off easily.
- Artist’s Loft — a relatively new brand
- Aspire — Long ink life considering they’re on the cheaper end. They do have issues with manufacturing. The nibs on some of them may arrive crooked.
- Azure
- Bianyo have a brush tip version as well as the bullet and chisel. These aren’t so easy to get outside the USA but Ali Express has them and ships worldwide.
- Blick Studio
- Caliart
- Chamaleon (unusual in that you switch lids to switch ink from one pen to another before it even goes on the page; this makes for a much slower drawing process). Expensive. Some artists work a bit like this with regular alcohol markers by touching the tips of two markers together.
- Dick Blick
- GraphicPro Duo — We’ve got a few of these, from Riot Art & Craft. They have regular sales and recently started stocking not only this brand but also the Copics (but not the full range, so far, and not all of the accessories). Anyway, the GraphicPro Duos have an annoying lid because the barrels are rectangle, but not so rectangular that it’s easy to see which way the cap goes on at first glance. (If you have king sized fitted sheets for a king sized bed you’ll know what I mean.) They don’t smell like fish! Win. They have a nice clean, chemically smell. They are not refillable, so at $5 a piece, you’re better off buying Copics for the long haul. However, I’ve picked these up for as low as a dollar, more typically for $2.50 (when you buy 5). I wouldn’t pay $5 for them. I’d splash out another few bucks and get the Copic Sketches.
- Keebor — These have been around 20 years, which makes it one of the more established brands. A good range of blues and greens.
- Masters Touch — the cap colours are completely off and the nibs don’t bend but they’re 1/5 the price of Copics.
- Mont Marte
- Nuvo come in packs of three of the same shade.
- Ohuhu
- Prismacolor — Mid-range price. Some artists say these are as good as Copic. However, they’re not refillable and you can’t replace the nibs. So over the course of your lifetime as an artist, Copic will work out cheaper.
- Shuttle
- Spectrum Noir — nibs are stiffer than the Copic, but much cheaper. They come in 168 colours in sets of 6 or 24. These are also popular because they are refillable. The number on the cap refers to its tonal value.
- Studio 71 (made by wholesale distributor Darice, an American craft supply company which started in 1954 and which is now a subsidiary of The Michaels Companies, Inc). Flexible tips, smooth ink flow, vibrant colours. But the nibs do fray so don’t press hard. Nice range of flesh tones.
- Touch-Bool — a cheap Korean brand from Wish.com. We have these. The pink one came with a defect in its nib, and the pinks also run out quickly. (My kid says it’s always the pink that runs out first.) The caps come off nicely, and they’re perfectly square, so you don’t have to worry about which way to put them back on. But with some of them, you try and pull the cap off and the entire top comes off. I’ve had to use sticky tape to fix them. They come with four families of grey: warm, cool, blue and green grey. They come in what looks like a make-up bag, and the zip rapidly broke on it. You’re actually meant to keep double-ended alcohol markers horizontal, but a lot of the large, cheap sets come in a cheap make-up bag type thing.
- Touchfive
- TouchNEW — the updated version of TouchFive markers
- TriBlend Spectrum Noir (unusual in that you pull it apart to reveal a third, medium sized nib). They sound quite squeaky on card stock. (Classique Spectrum Noir pens don’t squeak.)
- Winsor & Newton
THE MOST HIGHLY REGARDED BRAND OF ALCOHOL MARKER
The widely shared view among artists: Copic is the best. They are also the most expensive, but if you’re going to be creating art with alcohol markers across your entire life, they’re actually going to work out cheaper.
- The barrels can last a lifetime (if you don’t lost them)…
- …because they are refillable.
- You also change the nibs and select from a few different kinds (including brush).
- The colours on the ends of the markers accurately match the colour you’ll get on the page.
- Blending is nice and smooth.
- They come in a very wide range of colours.
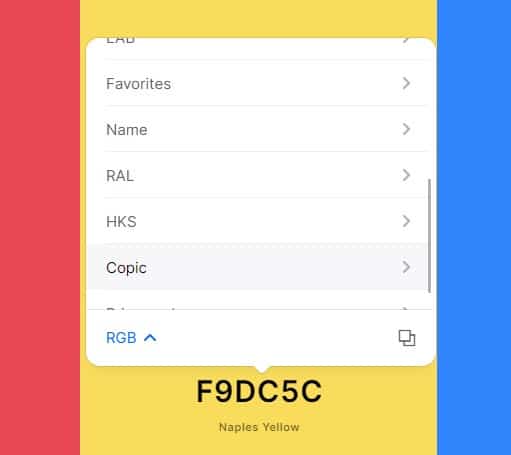
WHAT THE LETTERS AND NUMBERS MEAN ON THE CAPS
The letter refers to the colour family.
E = Earth Colors
BG = Blue-Green
B = Blue
BV = Blue-Violet
V = Violet
RV = Red-Violet
R = Red
YR = Yellow-Red (Orange)
Y = Yellow
YG = Yellow-Green
G = Green
F = Florescent
W = Warm Gray
C = Cool Gray
N = Neutral Gray
T = Toner Gray
The next number refers to the saturation, so 4 means 40% grey in it. 0 has no grey in it. 9 has a heap of grey in it. As this number goes up, the colour gets more gray but not more dark.
The last number on the Copic cap refers to its tonal value. This is its ‘darkness’. Extra zeroes means it’s even lighter than the colour with one zero. Once you get to number 9, you’ve got a colour as dark as black.
However, greys are labelled a bit differently: cool, neutral, toner and warm. These only have a number for tonal value. Obviously we don’t need a number which tells us how much gray is in it; gray markers are gray.
Earths are also labelled differently. Earths start with E. Feels like the colours that didn’t fit anywhere else were lumped into the Earth category, which includes a wide variety of hues from greens to reddish colours and of course a whole lot of browns. If you’re building a flesh tone set, they’d come from the Earth category. Copic sells a set of Set of 6 Skin Colours in a pack: E00, E11, E13, E15, E18, plus a red thrown in: R20.
Copic (pronounced ‘co’ as in ‘Lockwood & Co’) have four types of markers: Classic, Sketch, Ciao and Wide.
- Classic Copics: 214 colours, 9 different compatible nib options. Square barrel. One refill lasts 9 times.
- Sketch Copics: 358 colors, come with a Medium Broad and Super Brush tip. You can also fit a Medium Round nib (sold separately). One refill lasts 12 times. Oval barrel.
- Ciao Copics: 180 colors, Super Brush and Medium Broad nibs, a ‘beginner’ set to get you hooked on their brand. The barrels are smaller and some people believe they’re for kids. They do roll off the desk. One refill lasts 15 times because the barrel holds less ink.
- Wide Copics: Broad Calligraphy nib and an 18 mm nib, for covering large areas quickly, like putting down a watercolour wash, for laying in big blocks of colour before working on the detail. There’s a smaller range of colours in wide.
Of course you’ll always find artists who think the Copics are overpriced and who have a different favourite.
There’s no reason to remain loyal to a single brand. You can mix and match, according to budget. If you use a lot of grays, for instance, maybe splash out on Copic grays because over a lifetime the refillable nature of them will work out cheaper. But if you’re only going to use aqua for a certain project, maybe buy a cheap version of that.
Also, don’t feel the need to complete your collection with every Copic available. The price point is not really designed to encourage ‘completeness’. Not many artists in the world would own every single Copic marker, that’s for sure. Since they’re designed for blending, you can do a lot with just a few.
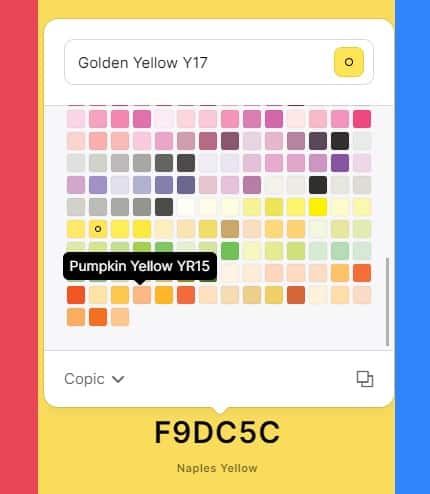
USING COPICS WITH FREE COOLOR PALETTE GENERATOR
If you’re used to digital art, and you use online tools or art software to create swatches there are places online where you can find the Copic marker which best matches the RGB.
Hands down the best way to find the hex and RGB equilents of Copic markers: The excellent free online Coolor palette generator.
Click on the HEX value of a color to open the Color Inspector. You can then input your color in several different values like RGB, CMYK, LAB, HSB and even popular color libraries like Pantone® and Copic®.
Coolors help
PAPER FOR ALCOHOL MARKERS
To get the most out of your alcohol markers you need some kind of bleed proof paper. If you work on regular cartridge or, worse, watercolour paper, you’ll power through your ink really quickly. Absorbent paper is not what you want.
Ask for:
- Card stock
- Stamping card (if you’re in a crafting store)
- Layout pads (also bleedproof)
- Paper with ‘sizing’ on the back of each sheet. Sizing is used during paper manufacture to reduce the paper’s tendency when dry to absorb liquid, with the goal of allowing inks and paints to remain on the surface of the paper and to dry there, rather than be absorbed into the paper. e.g. Strathmore Bristol smooth papers are a popular brand. Pros tend to use Copic X-Press but it’s expensive. Copic’s Sketch paper is also very good. Tonic ultra smooth white is used for a wide variety of media including stamping.
- Matboard
- Glossy photo paper
- YUPO paper (Duralar is a cheaper version of synthetic paper but markers don’t blend as easily on it.)
- Graphix Dura-Lar Film is good for alcohol markers, especially if you want the brush strokes to show. “Grafix Dura-Lar® is the Acetate alternative. This polyester film combines the best features of Mylar® and Acetate to provide a highly versatile film.” (It’s as expensive as Yupo.)
Not surprisingly, the companies who make alcohol markers also often make paper. Art stores also have their own brands of bleedproof paper. The more expensive the markers, the more expensive the paper, cue surprise.
Whichever brand of paper you use, you’ll need to learn how it works, just like the markers themselves have a learning curve.


When laying down your first layer of colour (starting with the lightest version of the hue) you can tell if you’ve put sufficient ink on the page if you flip the paper over and you can see the shape you just made. This is how much ink needs to be on the page before it will blend beautifully.
Use cheap paper underneath e.g. ordinary old photocopy paper to soak up any extra ink and avoid ruining the surface you’re working on. Some papers do bleed though a little e.g. the brand Neenah card stock, which is apparently a good choice despite this.
BLEEDPROOF PAPER IS NOT THE SAME ON EACH SIDE
This bleedproof paper is not the same on the front and back — it does matter which size you colour on! The safest way of knowing is to leave it in the pad.
However, if you’re putting it through the printer (say) you may have ripped the page out of the pad. Which is the side with sizing on it?
The side with sizing on it is not the side you’re ‘meant’ to be drawing on. You’re colouring on the sizing side if the ink remains a bit shiny and watery, as it takes a bit longer to dry. The sizing side makes the ink look glossy and catches the light.
Whend drawing on the ‘correct’ side, flip the paper over and you won’t be able to see the mark you just made. If you’re working on the correct side of sized paper, you’ll be able to see the shape you just made from the other side.
That said, some guitarists play very well holding their instrument ‘the wrong way round’ and the same is true for art equipment. If you’re going for a glossy look, feel free to use ‘the wrong side’ of the paper. The effect is quite different: Instead of blending colour, you’ll be lifting off the colour you’ve already laid down.
THE DOWNSIDE AND UPSIDE TO CARD STOCK
Card stock is the same on both sides. The disadvantage is that alcohol ink does bleed through but the advantage is that you don’t have to worry about which side you’re working on.
THE DOWNSIDE AND UPSIDE TO SIZED PAPER
Sized paper, on the other hand, is thin and slightly translucent, which is great if you want to trace something from underneath and not so good if you want to use an eraser (for a pencil underdrawing, say). Although translucent, this paper is surprisingly robust. Erasers are likely to wrinkle it.
‘Render’ marker paper refers to heavier weight paper with sizing on it, which isn’t translucent. It’s called ‘rendering paper’ because it stands up well to plenty of colour rendering.
ALCOHOL MARKERS ON ACETATE/MYLAR/overhead projector paper
The artist below is drawing an abstract landscape using a couple of Copic Wide markers. He warns that the ink ‘never really dries’ or ‘dries tacky’, so take a photo of these or make a mess of your scanner.
TECHNIQUES
WORK SLOWLY
It’s easier to blend while the ink is still wet, so artists making use of blending functionality work small sections at a time.
SWATCHING OUT YOUR MARKERS
When you get your alcohol markers, whichever set you have, from whichever brand (or blend of brands), make yourself a colour chart (on whichever brand of paper you’re using) and experiment with overlaying colours. This is what they’re really good for. By laying one colour over another you’ll get a brand new colour, expanding your colour options.
If you buy a set of markers, they won’t necessarily come in an order that makes sense to you, so the first thing to do is order them how you like, corresponding to your swatch.
For a perfectly smooth blend
With alcohol markers, some artists work from dark to light. Most seem to work from light to dark. This is called ‘optical blending’. An example workflow:
- Cover the shape with colour, starting with lightest hue
- Now use your mid tone of the same hue
- Use the lightest hue again to blend
- Now go to the darker hue
- Blend again using the mid
- And back again, using the lightest hue to blend all of it
If you’re going for a no-streaks look, your process will look a bit like that, but other artists prefer to keep the ‘streaks’ in, showing the hand of the artist.
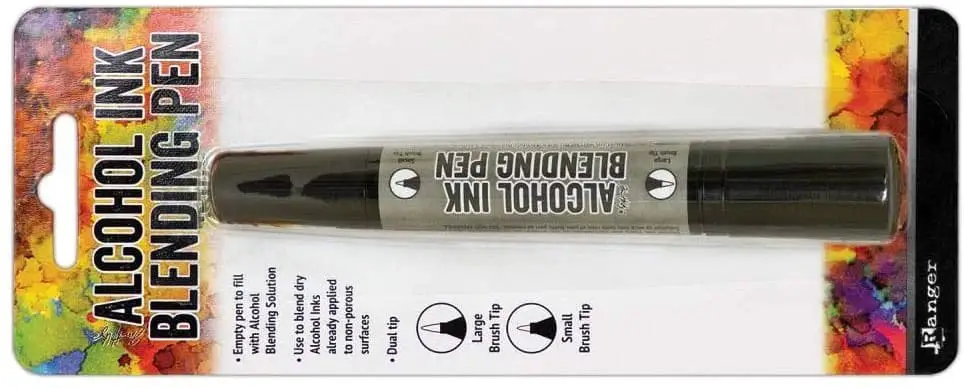
“Blender” pens
There are several opinions on what blender pens are actually for.
Some artists warn that the blender pen is not for blending. It’s for removing ink. (A better name for ‘blender’ pens would be ‘bleaching’ pens. Use ‘blender’ pens for when you accidentally colour outside ‘the lines’, for example.
Other artists use the ‘blender’ pen for soaking the paper first, which means every colour you put on top of that blends more smoothly, for artists who want to avoid streaks. This is probably what the blender pen is ‘designed’ for, because it explains why they’re called ‘blender’ pens.
Here’s what the blending marker is not: the alcohol marker equivalent of a blending stick.
Copic obviously realise that ‘blender marker’ isn’t the best name for this product, so they have a page on their website explaining all the ways in which the blender can be used.
AVOIDING ACCIDENTAL BURSTS OF COLOUR
Red in particular can be bad for this.
- Some artists take the caps off both ends while using them, to help relieve the pressure build up.
- While refilling, slant the marker slightly like you’re avoiding head on a beer (apparently)
NIBS
Get the most out of chisel nibs by turning the barrel of the alcohol marker around in your hand to create lines which vary in thickness from thin to medium to thick (the entire width of the chisel).
You’ll find with the cheaper brands the nibs are fibre tips (same as felt tips) and the ends will start to fray after a while instead of staying firm. The nibs are especially prone to fray on the cheap blending markers, especially when they start to dry out.
Foam tip markers are better. They bend and bounce right back (e.g. Copic Super Brush nib).
Try not to press too hard, especially on the softer bullet tips because that’ll smush them a bit.
Brush tips are exactly what they sound like — the width of the line varies according to how much pressure you apply, just like a paintbrush. The brush tip of an alcohol marker has another advantage: You will be controlling the flow of the ink a little bit more. One technique you can use with the brush tips, not available with the other types of nibs: feathering. I’ve also seen this called flicking.
Feathering (or flicking) is where you apply the side of the brush nib to the paper then sort of flick from there. This gives a more saturated inking where you apply the nib, and a ‘feathery’ look on the flicked part. The flicking leaves less ink on the page, which is handy when you’re gradiating a couple of colours together.
MAKING DARKER TONES
Don’t make the mistake of thinking that you need, say, three reds in light, medium and dark to draw a red ball in shadow. Artists can create dark tones by using greys. Brands with a large colour range sell grays in different families. Copic sells cool, neutral, toner and warm sets.
Unless you’re a professional making a photorealistic piece of art, or work a lot in black and white, when buying these Copic families, stagger them. Start with 0, 1, 3, 5 and 7, and also the black if you go really dark in your art. Toner greys and warm greys are pretty similar, so you may not want to splash out on both. They both have a bit of brown tint, but the warm greys have more brown. The cool greys have a bit of blue in them. The neutral has neither brown nor blue tint. Pure grey.
These greys can blend with hues to create darker versions of those hues, though it takes a bit of experimentation because certain grays work better with certain colours.
Of course, you don’t have to use grey to make dark tones. Experiment with other dark hues and see if they look good. Purple darks might make the picture pop, for example.
STARTING WITH An outline
Many crafters like to start with a rubber stamp to create an outline, so if you love the colouring but aren’t so keen on the drawing, this is one way of enjoying alcohol markers. Memento is apparently a good ink for use with alcohol markers, but any water based ink should be okay.
Some artists create the line art on computer then print it out on bleedproof paper ready for colouring with alcohol markers. The good news is, computer ink works well with alcohol markers: alcohol won’t smudge it. But let it dry first. Don’t start colouring as soon as your printer spews it out.
Some artists swear by using fine tip water based markers to create the outline. Copic sell their own, called Copic multiliners. Make sure it’s water based. Whichever brand you buy, make sure the markers won’t make them run. You can test new markers without ruining your expensive alcohol marker nibs: Lay some marker down on your bleedproof paper, get yourself a q-tip, dip it in isopropyl alcohol and see if you can smudge the line with that. The ink in alcohol markers is similar enough to isopropyl alcohol.
Liners that don’t smudge with alcohol markers:
- Pental pocket brush
- Black Le Pen
- Pilot G2
Even if you’re using smudge proof ink, sure the ink is fully dry before starting to lay down the alcohol marker otherwise you’ll get the outline smudged.
Some artists use graphite to create sketches, but don’t press hard.
Other artists start with coloured pencil sketches. But again, don’t press hard. The alcohol markers can pick up the wax and it gets onto the nibs. It can clog the nib.
After you’ve made an outline, it’s a good idea to make a few copies of it before starting to colour, in case you stuff up the colour and have to do it again.
MIXED MEDIA
Although it pays to be careful starting with coloured pencil and going over top with alcohol markers, you won’t have a problem using coloured pencil on top of alcohol marker. This is definitely a more budget friendly way of achieving a coloured image with nice gradation of tones.
Some artists lay down the tone (using the gray range of alcohol markers) and then build up colour with coloured pencil.
You can alternatively lay down flat colour with the alcohol markers then add tones with the coloured pencil after.
Copic sells a little bottle of Copic opaque white which is used for highlights. It looks like a bottle of nailpolish. White gel markers can also be used for this purpose. White Sakura gelly rolls are good. They come in three widths.
ALCOHOL MARKERS AND ALCOHOL INK
You can start a work of art by applying alcohol ink on a paper such as YUPO paper, or another brand of synthetic paper for alcohol ink. Wait for it to dry then add details with alcohol markers. Alcohol ink markers can also help with controlled blending and texture while a layer of alcohol ink is still drying. Once the alcohol ink is dry, other kinds of markers can be used.
RUBBING ALCOHOL
Rubbing alcohol is the ‘poor man’s colorless blender’. You can try using this to add effects to your alcohol marker drawing e.g. dots, bubbles.
Do not spray alcohol inks or alcohol ink blending solution. These products contain a flammable resin solvent. Use other methods to apply these products to a surface (droppers, or flicking a paintbrush, ink blower, straw, a hairdryer typically). However, you can fill a little spray bottle with regular isopropyl alcohol and use that to create effects on your alcohol marker works of art before they’ve fully dried.
You may be wondering if you can fill a watercolour brush with isopropyl alcohol and use it with alcohol marker art. The answer is you will probably be disappointed. The brushes are too ‘brushy’. The only thing that happens is your paper gets wet.
You’re better off filling something like this with isopropyl alcohol:
Use in a well-ventilated area.
MAINTENANCE OF ALCOHOL MARKERS
Store them away from the sun.
Keep them close to room temperature.
If a marker becomes tainted with another colour by accident, wipe it on a paper towel or scrap paper, unless you are going for the ‘dirty brush’ look.
Some people find that when their non-refillable markers run out, they can be rejuvenated by rubbing a little alcohol on the tips and then storing them in a vertical position so the remaining coloured ink can run into the nibs.
Some people manage to gently yank the nibs off cheap markers which have run out and fill the barrel with rubbing alcohol. This rejuvenates the colour somewhat.
Some cheaper brands of alcohol marker even fit the Copic nibs, but Copic nibs are expensive, so you’re not really saving all that much money.
